|
|
| ||
Running a Configuration and Viewing the Results
After you have successfully added the pre-made configuration to your Experiments page, follow the steps below to run the experiment you selcted.
1. On the left side of the screen in the “Experimenters” box, click on the link for “Experiments”:
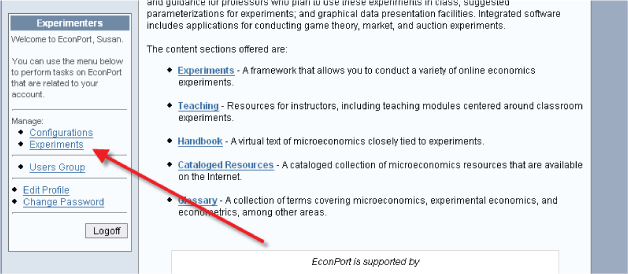
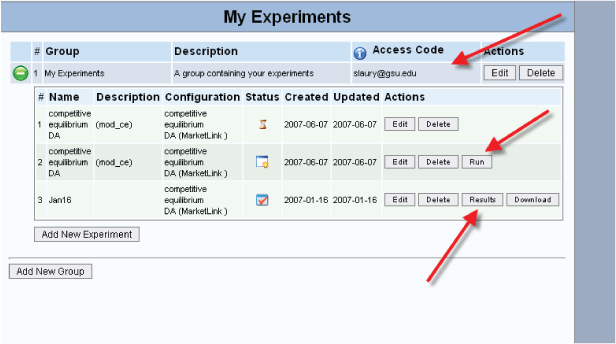
2. When you get to your Experiments page you will see all of the experiments that you have available. There are several things in this box to note:
![]()
First, at the top of the figure above, you can see your “access code” – this is what you will give to your class. Each student will have to enter this access code in order to log into your experiment. Your "access code" is defined when you set up your account.
Next, you will see a list of all experiments you have created. In the list above there are three.
The first experiment is not yet ready to run, but still can be edited. This is symbolized by the hourglass icon under the status column.
The second experiment is setup and ready to run (this is the one that you just created above). If you would like to use this experiment with your class, click the “run” button.
3. You will get to the “terms of use” box – you will have to click the button to “accept and continue” to run the experiment.
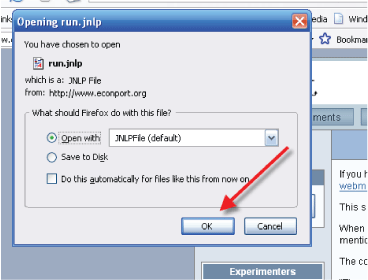
4. If you see the following box, go ahead and click the “OK” button:
5. A new box with server parameters will appear:
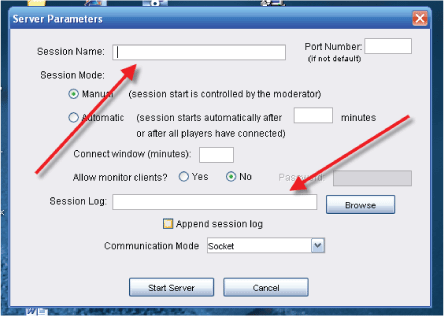
On this page, you will need to specify the Session Name (anything you want to name it – but be sure it is unique; for example, Ec2105June9_07) and a Session Log – this can be the same as the session name. Then click “Start server”
6. Now the server window opens:
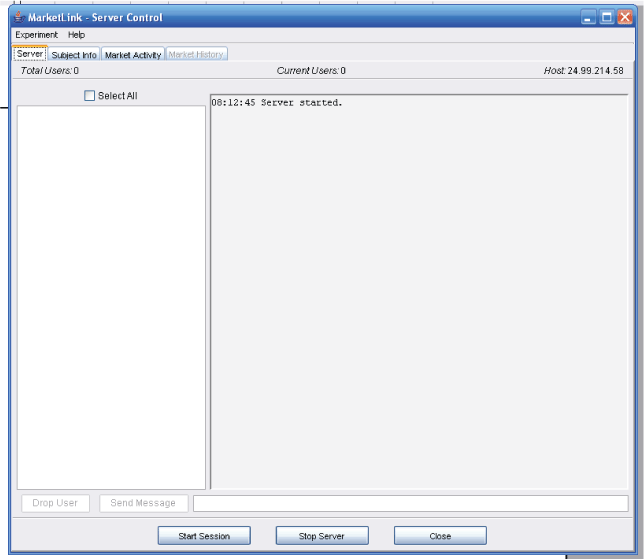
You will see in this window as your students log on (see Instructions for Students). They will alternate between being assigned as buyers and sellers. When all students have logged on (or when you are ready to start the experiment) you can click the “start session” button at the bottom. However, you will not be allowed to start the experiment until at least one buyer and one seller have logged into the experiment.
7. In this server window, you can watch the experiment as it continues. This window also allows the experimentor to view the results of the experiment.
If you want to test the software, you can open additional browser windows, go to Econport and then login as a student – but each student you log in must have a different name.
NOTE: The above example utilizes the MarketLink experiment software. Other pre-made configurations may have different server windows. If you would like more information about how to use a specific server window or viewing results, you may select the appropriate software link below corresponding to the software used by the pre-made configuration you selected.
| Copyright 2006 Experimental Economics Center. All rights reserved. | Send us feedback |


